Introduction

Tertiary Collection of Student Information (TCSI)
TCSI is a joint project between the Department of Education, Skills and Employment (department) and Services Australia to transform how student information is collected.
Any training providers that report data through the HEPCAT system will eventually be required use of the new TCSI system to report data to the Australian Government. This includes HELP providers, VSL providers and higher education providers reporting the TEQSA PIR collection.
All data is reported in data packets, with each packet comprising of specific data elements.
The preferred TCSI reporting submission method uses an automated processes known as business to government (B2G) application programming interfaces (APIs) and authentication with PRODA (Provider Digital Access).
PRODA is the authentication method for TCSI and facilitates the secure access to government services online.
APIs send data from a provider's student management system to the government with a minimum of manual processing and enables student management software to interact in near real-time.
For more information see Department of Education - Transforming the Collection of Student Information (external link).
Meshed Platform integration with TCSI
The Meshed Group is committed to TCSI to ensure Provider data from Meshed Platforms will be correctly and accurately reported to the relevant Government entities using business to government (B2G) application programming interfaces (APIs) and PRODA authentication.
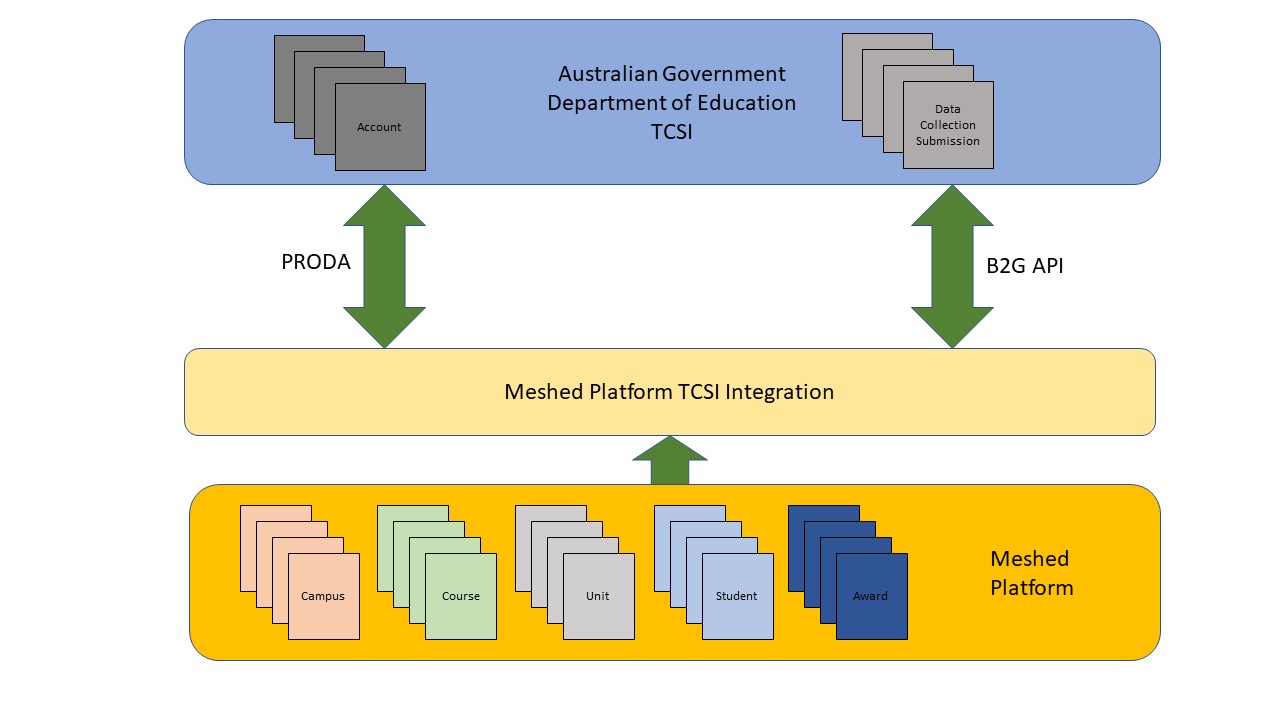
Meshed Platform and TCSI
TCSI functionality is dependent on data and configuration within the platform as shown in the diagram below.
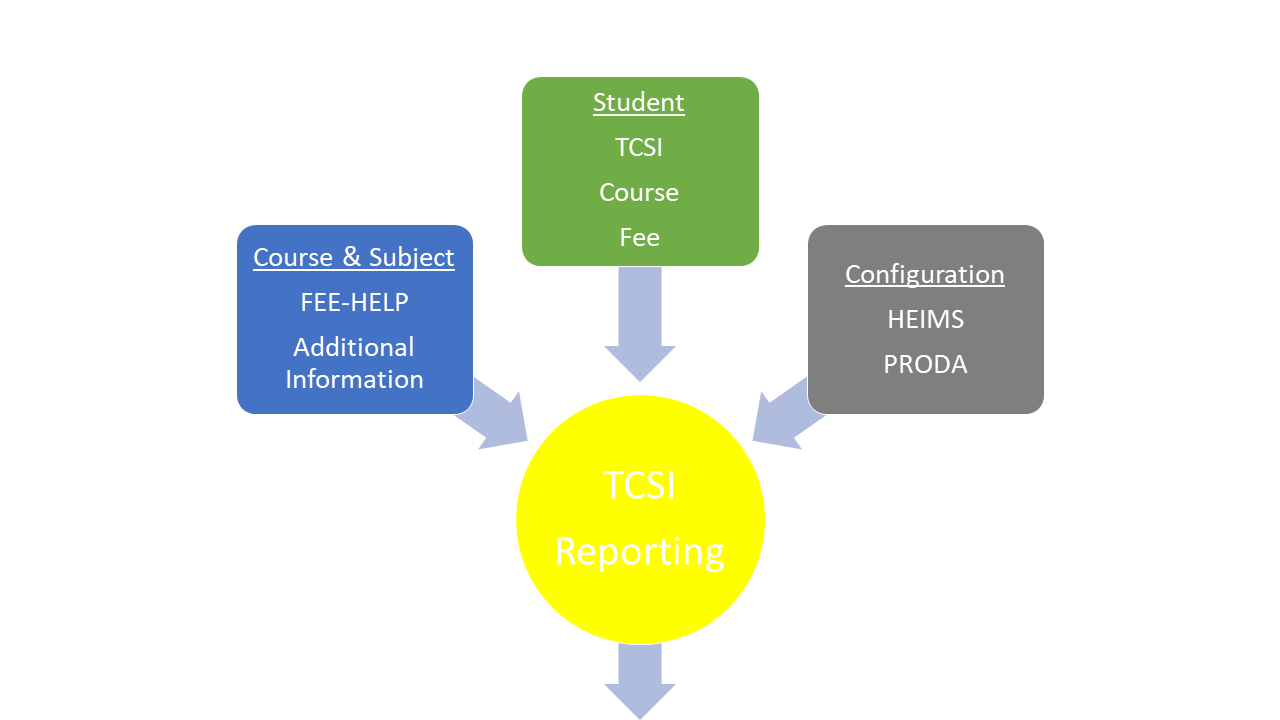
The TCSI related functionality in the Meshed Platform is described below.
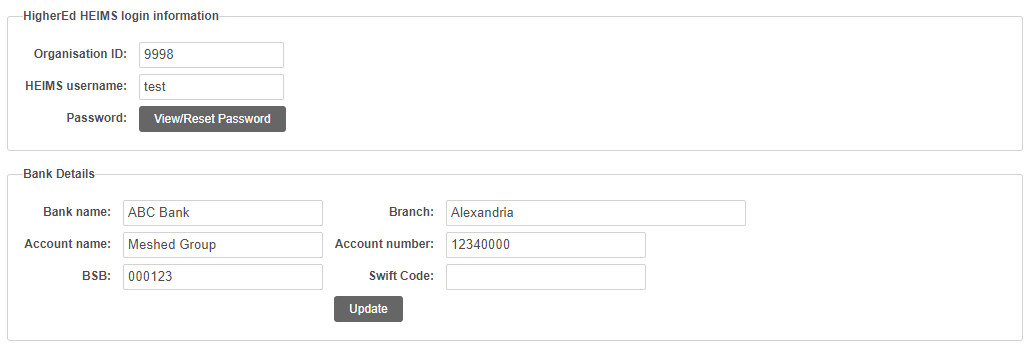
HigherEd HEIMS login information
To setup HigherEd HEIMS login information in the system, follow the instructions below:
Click Admin > Configuration and Setup > Provider Info
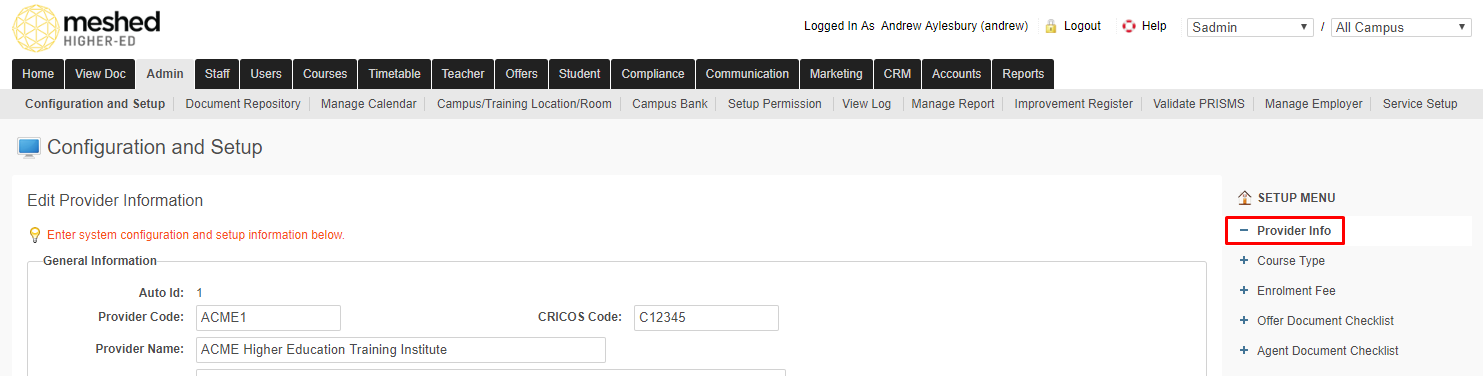
Scroll down the Provider info page and look for the HigherEd HEIMS login information section
Enter your Organisation ID and HEIMS UserName
Click View/Reset Password
Enter your Password
Click Update to save changes
| Info |
|---|
To obtain an Organisation ID and HEIMS Username, a Provider is required to register to access the HEIMS applications. |
Course Information
To update an existing Course with FEE-HELP information, follow the instructions below:
Click Courses > Course
Identify the Course to edit in the list.
Click the Edit Action Icon
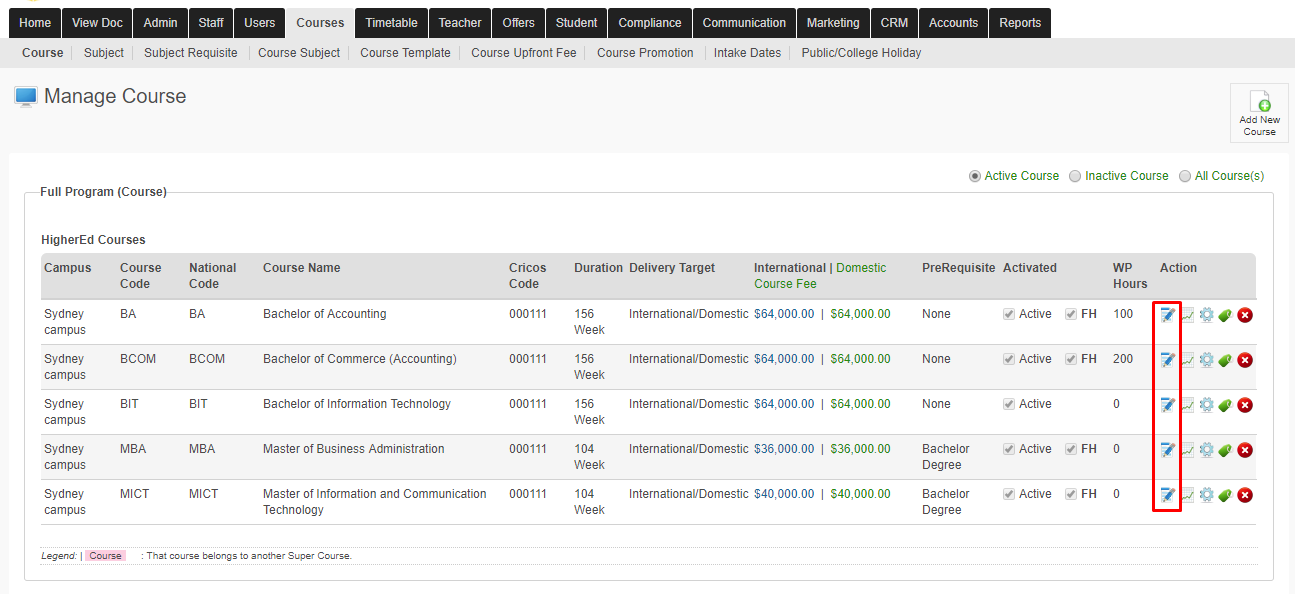
In the Specific Information section, select Fee Help Yes to indicate that this Course is enabled for FEE-HELP.
Enter the Fee Help Study Load on the field provided.
Select the Fee Help Study Type from the drop-down. This should match with the Qualification Level of the Course.
Click Record Now to save the changes.
A confirmation message will appear on the page to indicate successful Course update.
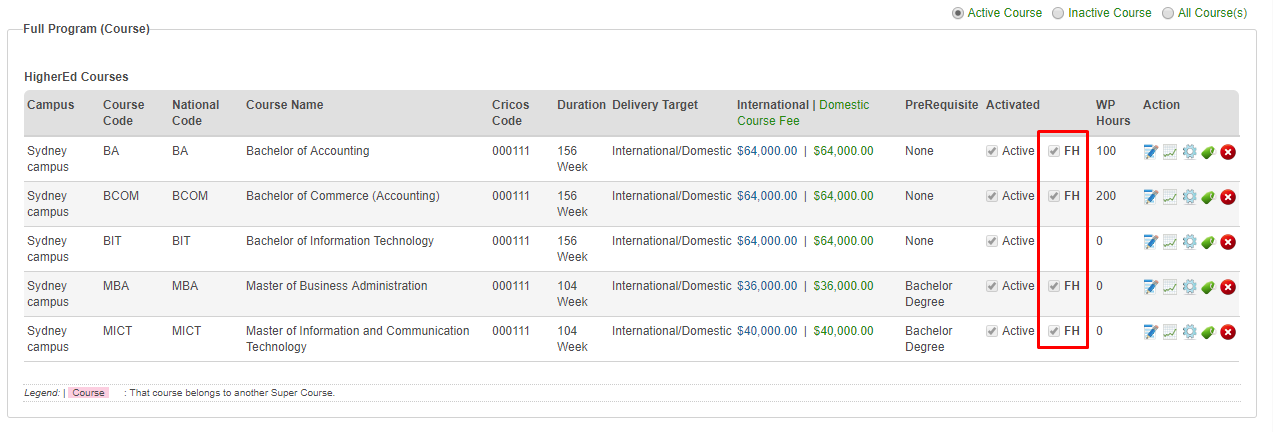
On the Manage Courses page the Courses with FEE-HELP enabled are indicated with a FH checkbox.
To update the Course Higher Education Additional Information, follow the instructions below:
Click Courses > Course
Identify the Course to edit the Higher Education Additional Information in the list.
Click the Higher Education Additional Information Action Icon
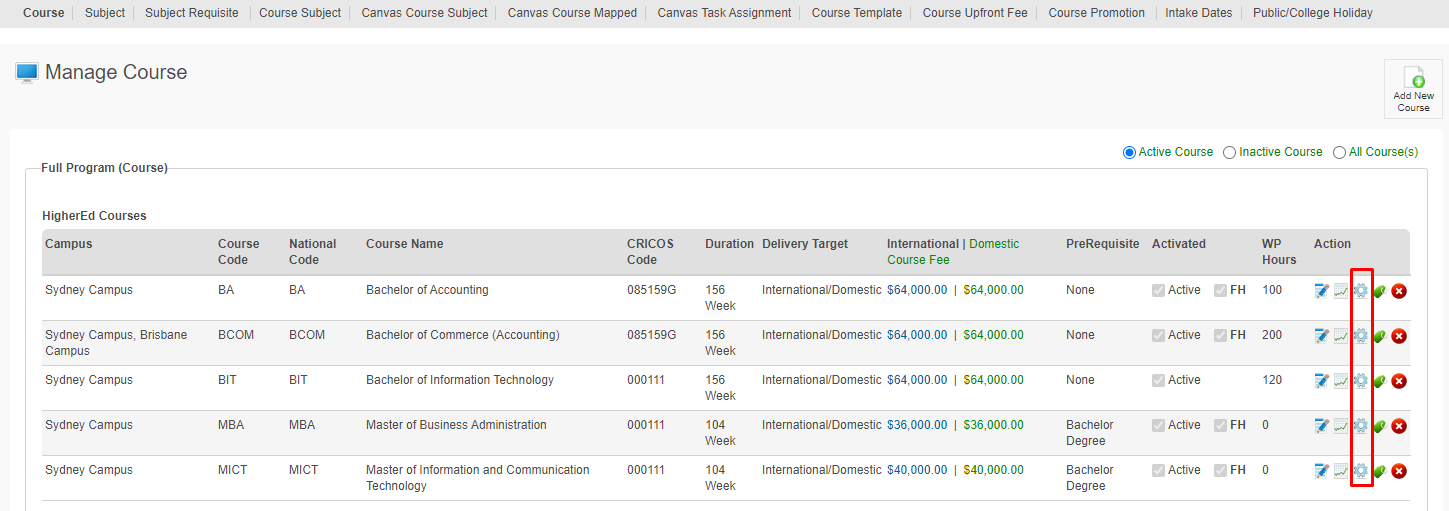
Enter or update the Provider specific Higher Education Additional Information in the fields provided.
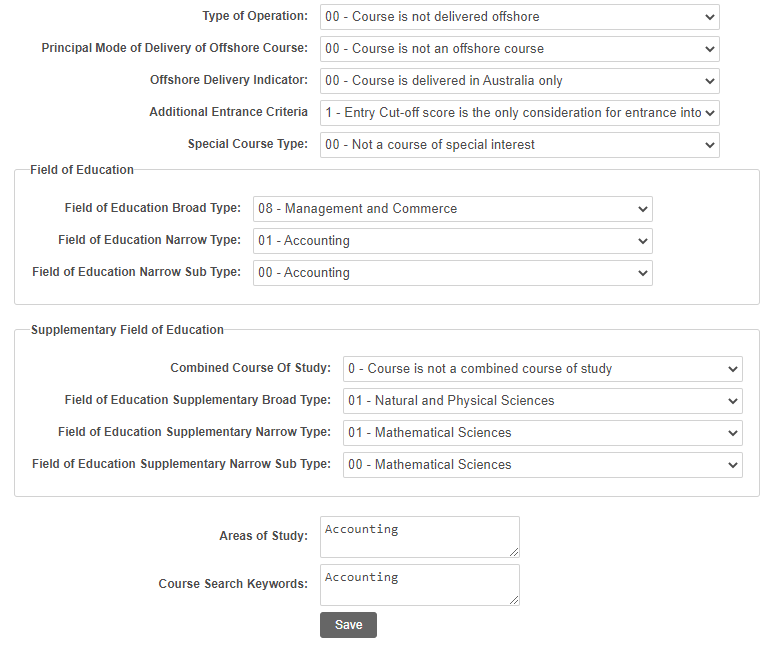
Click Save to make the changes
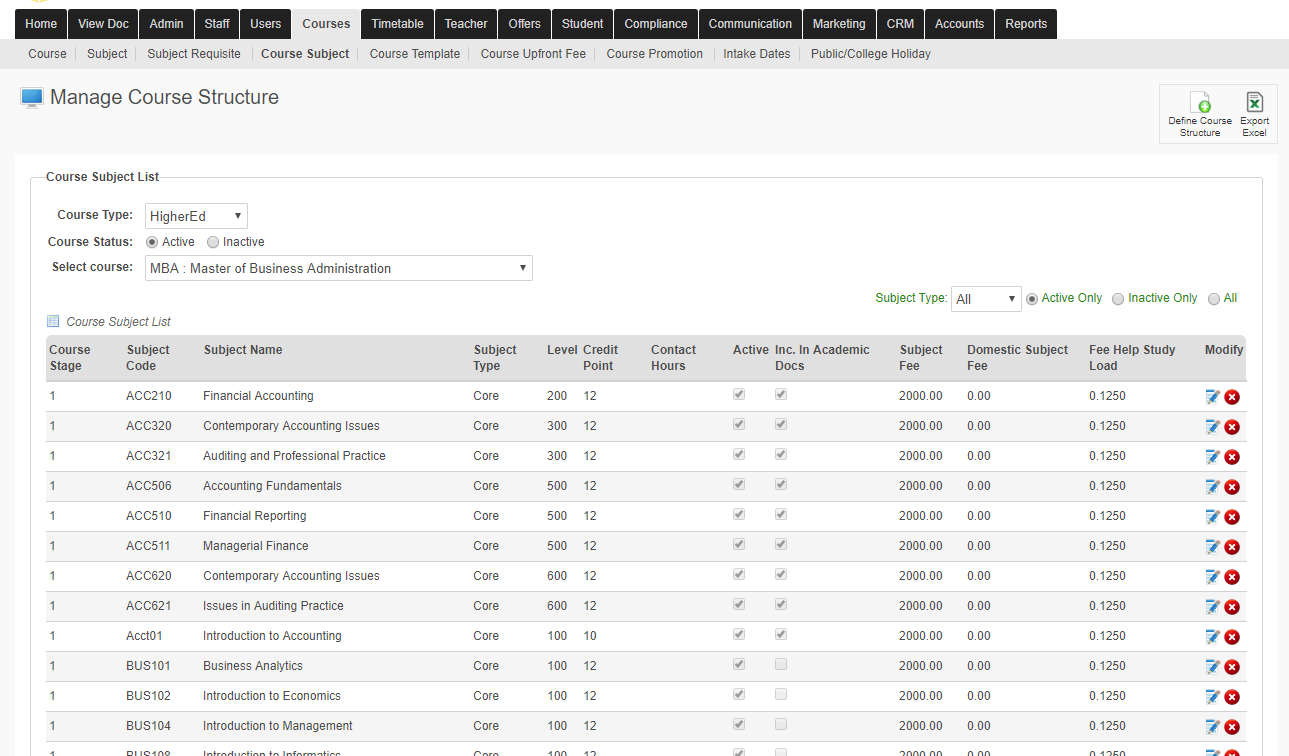
Course Subject Information
To update an existing Course Subject structure with FEE-HELP information, follow the instructions below:
Click Courses > Course Subject
Select the required Course Type, Course Status and Course
Identify the Subject to edit in the list.
Click the Edit Action Icon
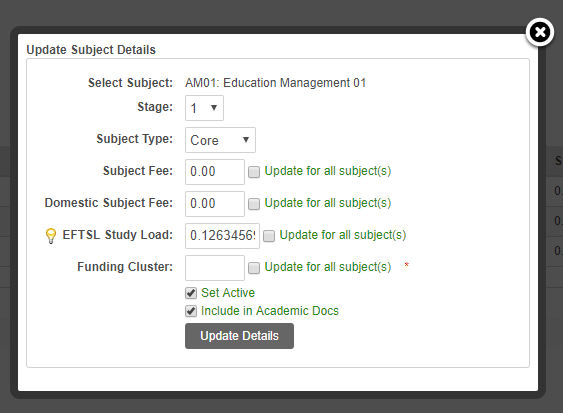
The Update Subject Details window is shown
Enter the required Stage, Subject Type, Subject Fee, Domestic Subject Fee, and EFTSL
Click Update Details
Student TCSI Information
To update Student TCSI information, follow the instructions below:
Click Student > Student Management Homepage.
Search for the Student using information e.g. Student ID
Click Search
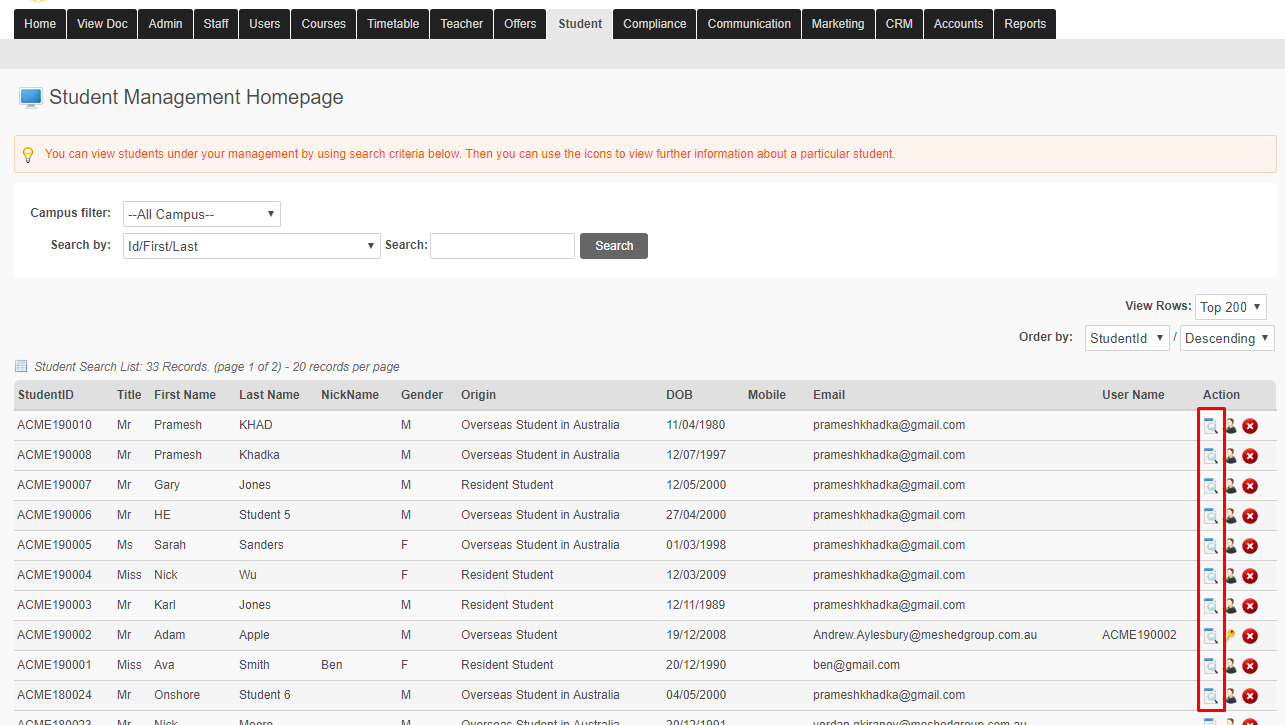
The Student name will appear on the list. Click this icon to go to Student Profile Summary
On the Student Profile Summary, click the TCSI Action Icon
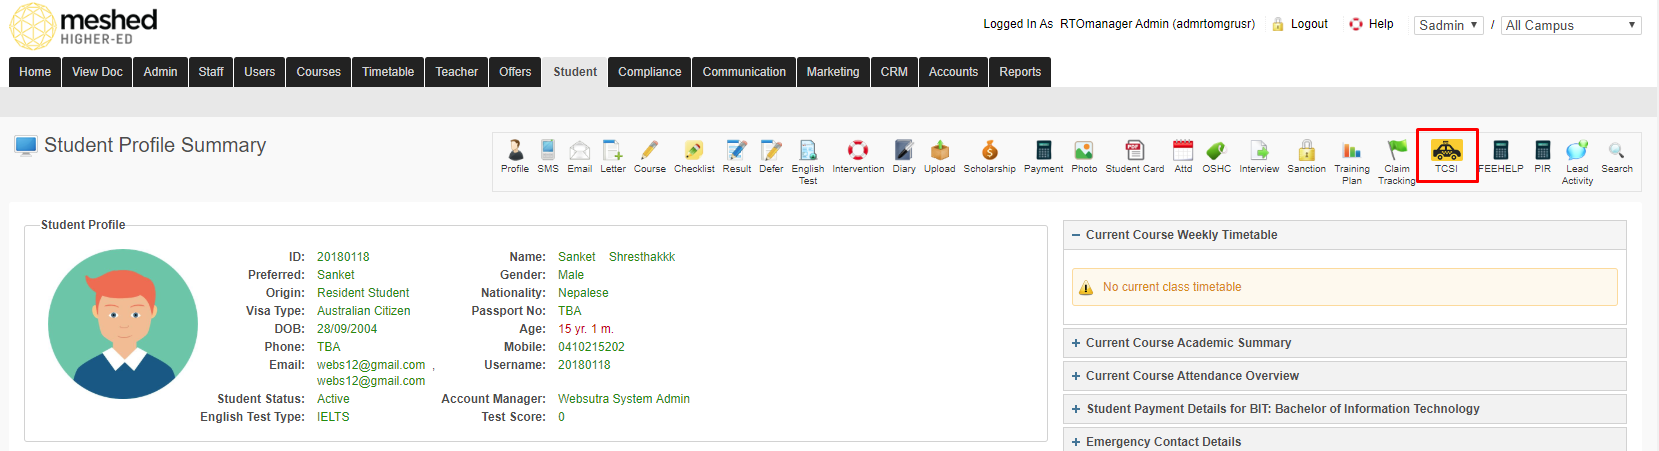
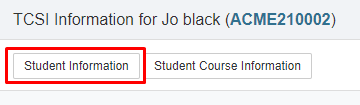
Student Information
Select Student Information
Basic Student Information
Select Basic Information
Enter the required information
Click Add
| Info |
|---|
TCSI reporting has a maximum of 10 Characters for Student ID. Student ID is managed in Admin > Configuration and Setup > Student ID Format (SAdmin or Admin roles) |
Commonwealth Scholarship Information
Select Commonwealth Scholarship Information
Enter the required information
Click Add
Disability Information
Select Disability Information
Enter the required information
Click Update
CHESSEN
A CHESSN can be created for the Student after the Basic Information is saved for the first time.
Select Basic Information
Click the CHESSEN Icon
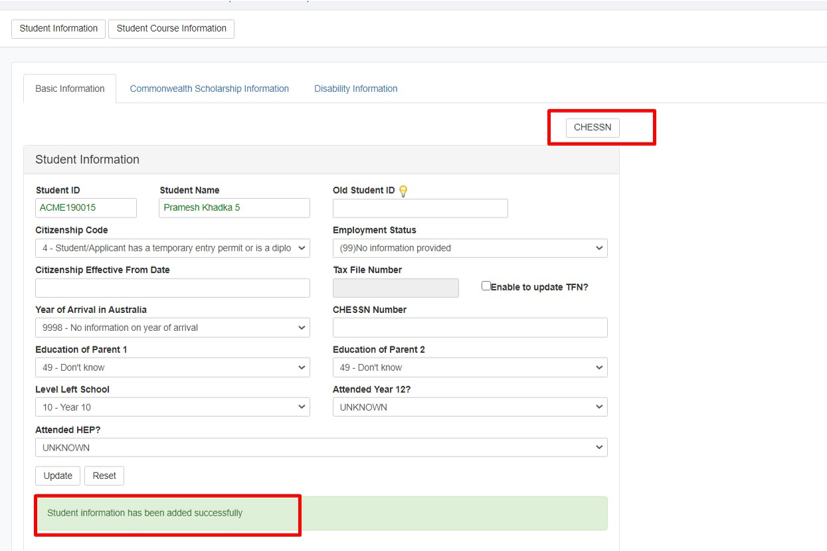
The Provider needs to ensure that there is already a setup for the organisation ID, Username and Password before generating CHESSN number. System will then connect with HEIMS and based on the student information recorded and TFN it will either get the CHESSN if already exist or create a new CHESSN.
| Info |
|---|
CHESSN is the acronym for Commonwealth Higher Education Support Number. It is a unique identifier assigned for an entire Student life. This number helps the government and providers to provide Students with information about any Commonwealth assistance (scholarships or loans) the Student may have used. The Provider needs to ensure that there is already a setup for the organisation ID, Username and Password before generating CHESSN number. System will then connect with HEIMS and based on the student information recorded and TFN it will either get the CHESSN if already exist or create a new CHESSN. The CHESSN will be decommissioned gradually from 2021 and replaced by the Unique Student Identifier (USI). |
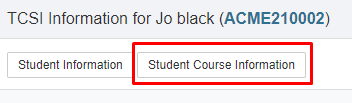
Student Course Information
Select Student Course Information
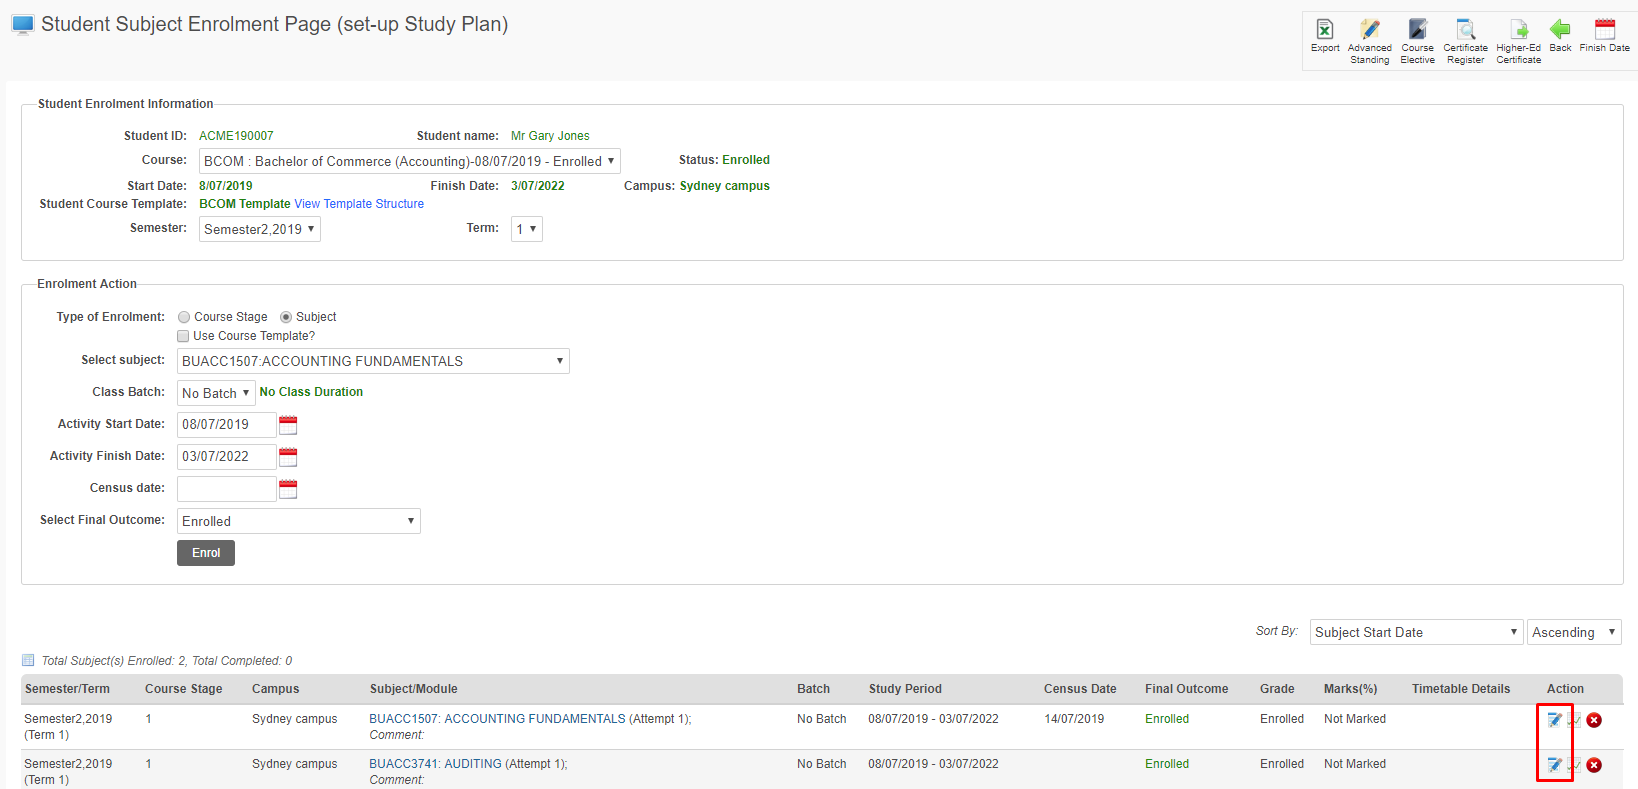
Course Information
Select Student Course Information
Enter the required information
Click Add
Scholarship Information
Select Student Course Information
Enter the required information
Stipend Information
Select Stipend Information
Enter the required information
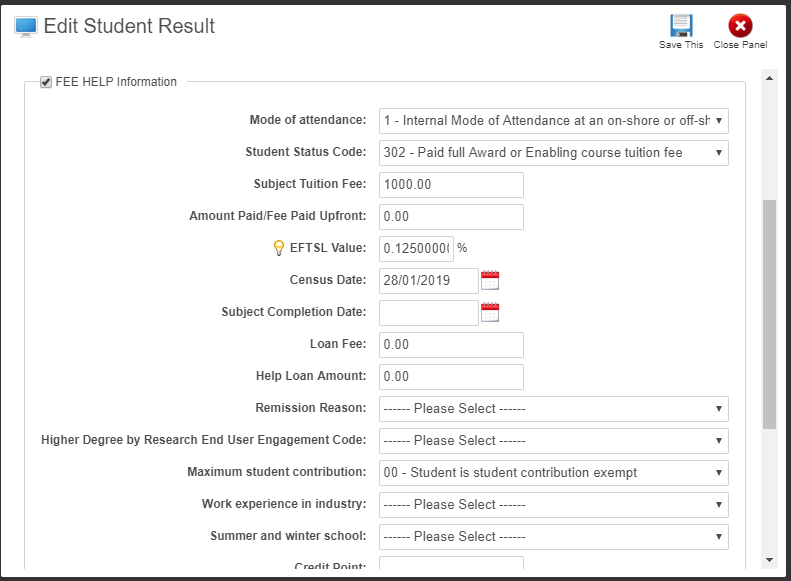
Student Fee Information
To update Student FEE-HELP Fee information, follow the instructions below:
Click Student > Student Management Homepage.
Search for the Student using information e.g. Student ID
Click Search
The Student name will appear on the list. Click this icon to go to Student Profile Summary
On the Student Profile Summary, click the Result Action Icon

For the required Subject, click the Update Outcome Action Icon
The FEE-HELP related information can be edited.
Click the Save This Action Icon
TCSI Reporting Configuration
To configure the TCSI reporting in the Meshed Platform:
Click the TCSI - Manage TCSI Services icon on the Home page

The TCSI Reporting page is displayed
Click the Configure PRODA tab
The PRODA Configuration page is displayed
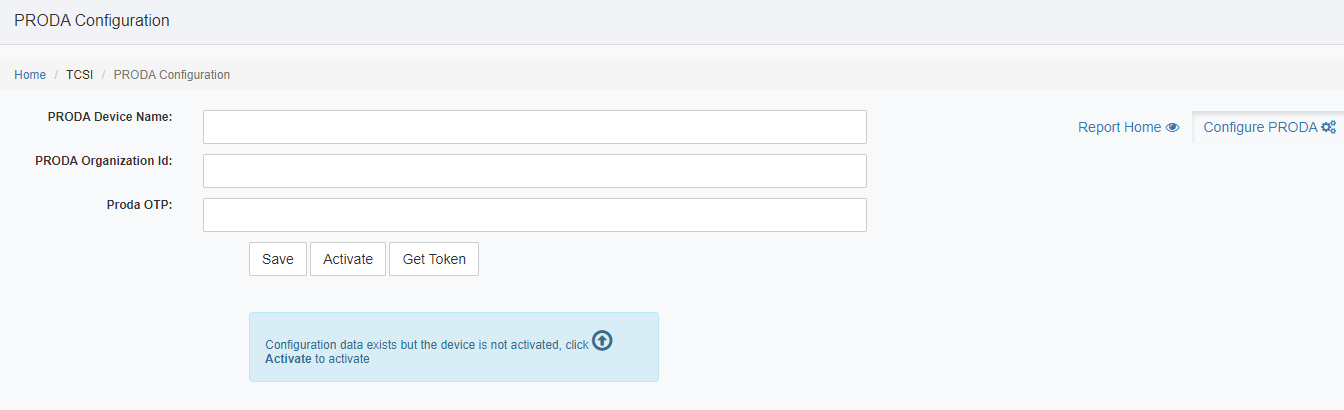
Provide B2B device credentials then click Save and Activate
| Info |
|---|
PRODA (Provider Digital Access) PRODA is an online identity verification and authentication system. It lets you securely access government online services. More information can be found here (external link). |
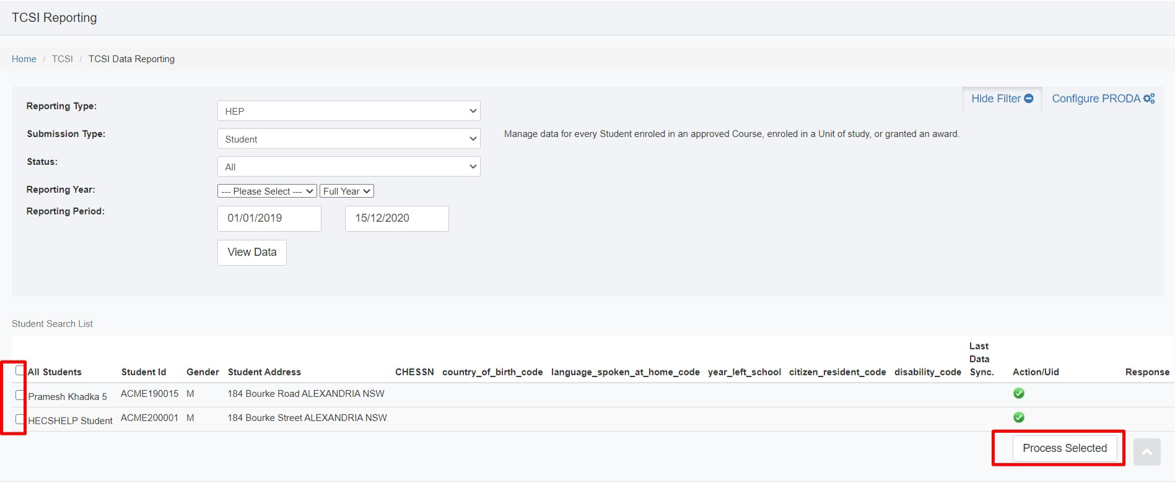
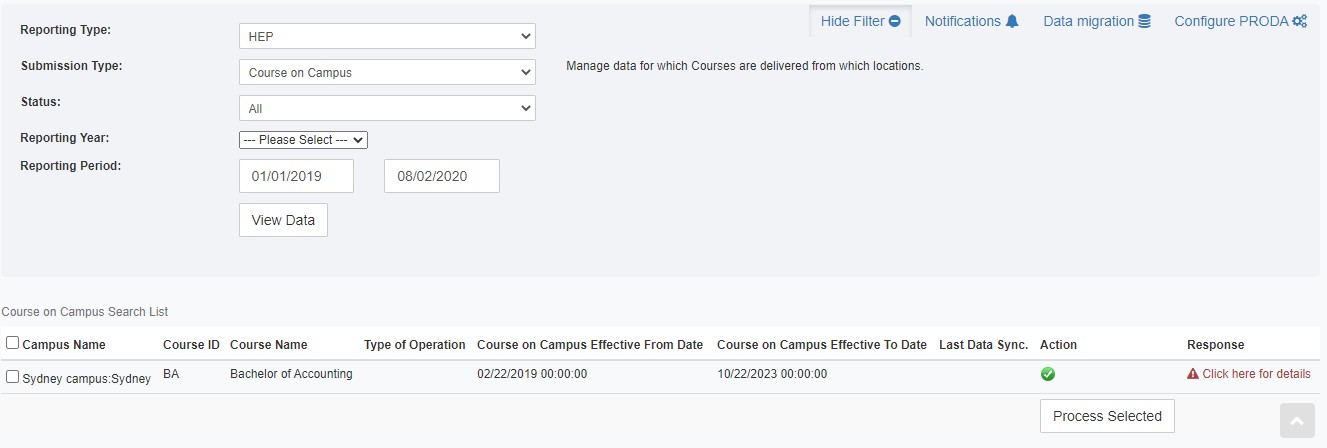
TCSI Reporting
The TCSI Reporting Submission Types available are:
Course of Study
Course
Campus
Course on Campus
Student
Course Admission
Unit Enrolment
To use the TCSI Reporting Submissions in the Meshed Platform:
Click the TCSI - Manage TCSI Services icon on the Home page
The TCSI Reporting page is displayed
View Data
To show the data for a submission type:
Select the Reporting Type as HEP
Select the required Submission Type (see the descriptions below) data that will be shown
Submission (Packet) Type | Description |
|---|---|
Course of Study | Manage data for each approved Course of Study in which one or more Students will be enroled. |
Course | Manage data for each Course offered. |
Campus | Manage data for each delivery location which delivers one or more Courses. |
Course on Campus | Manage data for which Courses are delivered from which locations. |
Student | Manage data for every Student enroled in an approved Course, enroled in a Unit of study, or granted an award. |
Course Admission | Manage data for admission of every Student to a Course who may need to enrol in units of study to complete the course. |
Unit Enrolment | Manage data for Students when enroled in a Unit of Study. |
Select the required Status (see the descriptions below) for the data that will be shown
Status | Description |
|---|---|
Processed | Show data that has previously been reported to TCSI. |
Not Processed | Show data that has not yet been reported to TCSI. |
All | Show both Processed and Not Processed data. |
Enter the Reporting Year and Reporting Period for the data that will be shown
Click View Data
The data will be shown in a table on the page
The left most columns are specific to the Submission Type
The Last Data Sync. column will contain date and time information only for Not Processed data
The Action column will show Action Icons for management of the data
The Response column will show Success, Warning, or Error information related to management of the data
| Info |
|---|
Reporting needs to be conducted in following sequence: Course of Study >> Course >> Campus >> Course on Campus >> Student >> Course Admission >> Unit Enrolment |
Manage Data
The following Action Icons are used to individually manage the data for a Submission Type.
Icon | Description |
|---|---|
 | Report data to TCSI. This Icon is available for Not Processed data. |
 | Delete the TCSI data. This Icon is available for Processed data. |
 | View the data retrieved from TCSI in a new window. This Icon is available for Processed data. |
 | Update the TCSI data. This Icon is available for Processed data. |
Numerical Value | The assigned unique TCSI Reference Number. This information is available for Processed data. |
Bulk Process Data
To bulk Process data for a Submission Type:
Select required data in the list using the Check Boxes
Click Process Selected
Response
The Response for each Action or Bulk Process will be shown in the Response column - click the text for additional information in a new window.
The response can contain any of three types of information messages:
Success - green
Warning - orange
Error - Red
Error Codes come directly from TCSI.
