Course Management
- RTOManager Admin (Deactivated)
- Raj Rayamajhi
- Andrew Aylesbury (Deactivated)
Overview
Course Management
Managing courses is an important aspect of delivering quality education to international students. Course management involves the planning, development, delivery, and evaluation of courses to ensure they meet the educational needs and expectations of students. The following is an overview of the key aspects of course management for a CRICOS provider:
Course planning: CRICOS providers need to plan their courses to ensure they are aligned with the Australian Qualifications Framework (AQF) and meet the requirements of the relevant industry or profession. This includes developing course outlines, learning outcomes, and assessment strategies.
Course development: Once a course has been planned, CRICOS providers need to develop the course materials, resources, and teaching strategies required to deliver the course. This may involve designing online learning modules, developing classroom resources, and preparing assessment tasks.
Course delivery: CRICOS providers must deliver their courses in a manner that meets the needs of their students. This may involve using a variety of teaching methods, including lectures, tutorials, practical sessions, and online learning.
Course evaluation: CRICOS providers need to evaluate their courses to ensure they are meeting the needs of their students and are aligned with industry requirements. This may involve gathering feedback from students, evaluating assessment results, and reviewing course outcomes.
Quality assurance: CRICOS providers must ensure that their courses meet the quality standards set by the Australian government. This may involve regular audits, internal reviews, and external assessments by accrediting bodies.
Compliance: CRICOS providers must comply with all relevant legislation, regulations, and policies related to course management. This includes complying with CRICOS registration requirements, maintaining accurate and up-to-date records, and ensuring that all staff involved in course management are appropriately qualified and trained.
Managing courses is an ongoing process that requires careful planning, development, delivery, evaluation, and quality assurance. CRICOS providers need to ensure that they have robust systems and processes in place to manage their courses effectively and provide quality education to their international students.
Scope
The scope of registration for an Australian CRICOS provider refers to the specific details of the courses or programs that the provider is approved to offer to international students. It includes information such as the names of the courses, the levels of education (e.g., primary, secondary, vocational, higher education), the fields of study or disciplines, the locations or campuses where the courses are offered, and the duration of the registration.
The scope of registration is determined and regulated by the Australian government through the Department of Education, Skills and Employment, and it is an important aspect of the registration process for CRICOS providers. It ensures that providers are authorized to offer specific courses or programs to international students and that they meet the necessary quality standards and regulatory requirements.
CRICOS providers are required to maintain accurate and up-to-date information about their scope of registration, including any changes or updates to their courses or programs. They are also required to provide this information to international students through their marketing materials, websites, and other relevant communication channels.
Meshed RTOManager
The Course menu allows you to manage:
- Courses
- Subjects
- Course Subjects
- Units
- Course Templates
- Upfront Fees
- Material Fees
- Intake Dates
- Course Promotions
- Public Holidays
- Training Plan Templates
Course
To setup, follow the instructions below:
- Click Courses > Course. This page shows a list of all the Courses available in your college including their location, tuition fees, course duration, etc.
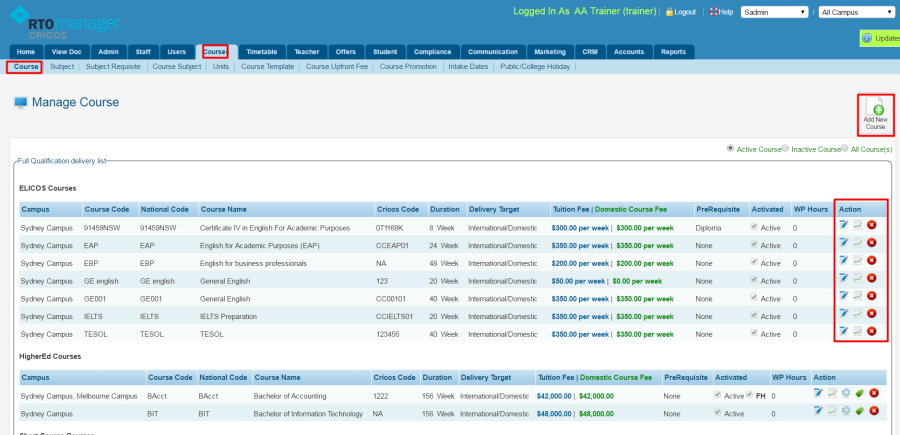
- Action Icons
 allow you to do edit/ view and delete Courses on the list.
 - To add a Course, click Add New Course.
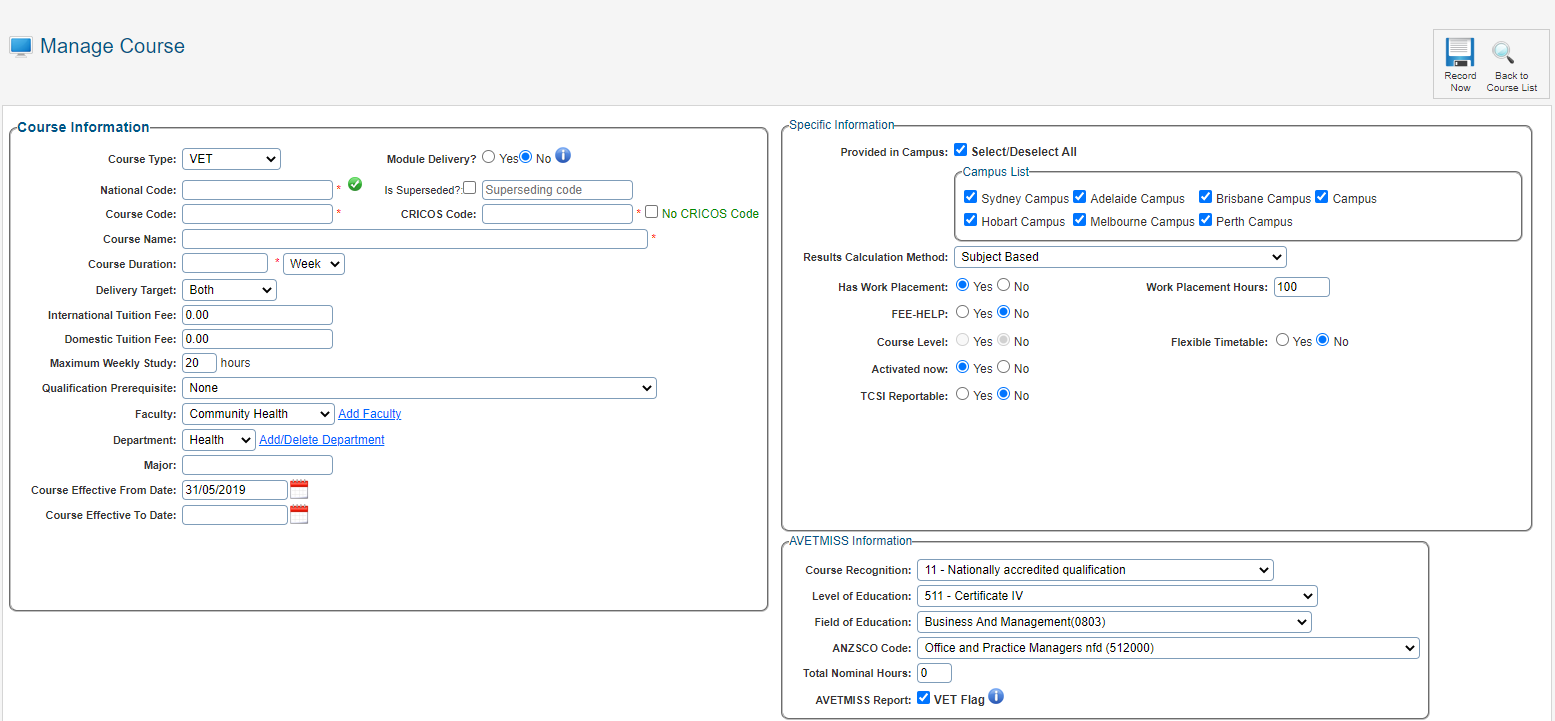
- Enter Course information which includes Course type, National code, Course code,* Course name, Course duration. Delivery target, Tuition fee, Maximum weekly study, Qualification pre requisite etc.
- Course code* – make sure to click the green check icon
 to get default related qualification information from AVETMISS qualification list. Please note this will only be applicable for VET Course Type.
- The information generated when you click the green icon will show up on this section. You may be asked to fill up the nominal hours
- Enter all information on Specific Information section
- Click Record Now to save.
Field Descriptions
| Field | Description |
|---|---|
| Course Type | The type (e.g. VET, ELICOS, etc.) of Courses that will be listed in the Course field. This selection determines which fields are displayed on the form. The types of Courses available in the System are visible in Admin > Configuration and Setup > Course Type |
| Module Delivery | The Course is delivered only as a module and not delivered as a full Qualification:
Only one option can be selected. |
| CRICOS Code | Each course recorded in the Commonwealth Register of Courses and Institutions for Overseas Students (CRICOS) is assigned a unique Course Code. This is a mandatory field. |
| No CRICOS Code | If the Course does not have a CRICOS Code then this should be checked. |
| National Code | A code that uniquely identifies a qualification, course or skill set. This field value is used for reporting and for Certificates generated by the System. |
| Course Code | A code that uniquely identifies a qualification, course or skill set. This field value is designed to be used by the College to identify the Course, and can use values that have specific meaning for the College. |
| Superseded | If the Course has been Superseded then this should be checked and the Superseding Course Code entered. |
| Course Name | The full name of the Qualification, Course or skill set |
| Course Duration | Displays the Course Duration for the Course. This may be shown as Day, Week, Month, or Year. |
| Delivery Target | There are 3 options for the Course delivery target:
Only one option can be selected. |
| Domestic Tuition Fee | Tuition Fee for domestic Students |
| International Tuition Fee | Tuition Fee for International (Offshore and Onshore) Students |
| Maximum Weekly Study Hours | Student maximum study hours per week |
| Qualification Prerequisite | Optional |
| Faculty | Optional |
| Department | Optional |
| Major | Optional |
| Course Effective From Date | The date from which the specific Course is valid. |
| Course Effective To Date | The date up to and including which the Course is valid. |
| Provided in Campus | This field is only visible if Multi Campus Optional module is enabled. |
| Results Calculation Method | Subject Based - All Units (one or more) within the Subject will have their results determined by the Subject outcome. Unit Based - Each Unit (one or more) within the Subject will have their results determined by the competency result of the linked Assessment Task(s). Unit Based across Subject - Similar to Unit based, however a Unit can be within more than one Subject. A Unit within multiple subjects will have its result determined by the competency result of the linked Assessment Task(s) in each Subject the Unit is within. Element or Performance Criteria & Across Subject Based - Similar to Unit Based across Subject, however the Unit is linked with a series of elements. A Unit with multiple elements will have its result determined by the competency result of each of the elements. |
| Work Placement | Activate the Course Work Placement information.
Only one option can be selected. |
| FEE-HELP | Activate the Course FEE-HELP information.
Only one option can be selected. Activation will display additional FEE-HELP related fields.
|
| TCSI Reportable | Activate the Course for TCSI reporting.
Only one option can be selected. |
| Course Level | Activate the Course Level function to define Level Assessments in Course Subjects, eg for ELICOS; Listening, Reading, Speaking, Writing.
Only one option can be selected. This field is disabled for some Course Types, e.g. VET. |
| Flexible Timetable | Enable the Course for Flexible Timetable allocation. Flexible Timetable enables the assignment of a Student to different sessions within the same subject over different batches (classes).
Only one option can be selected. |
| Activated now | Set the Course as Active or Inactive.
Only one option can be selected. |
| Course Recognition | A code which identifies the Recognised Program of Study to which the Course is classified |
| Level of Education | A code which identifies the degree of complexity of the Course This classification is based on the Australian Standard Classification of Education (ASCED) |
| Field of Education | A code which identifies the field of education to which the Course is classified |
| ANZSCO Code | ANZSCO (Australian and New Zealand Standard Classification of Occupations) code that identifies the type of occupation(s) to which the Course relates. |
| Total Nominal Hours | The hours that are expected number of hours required to complete the Program. |
| AVETMISS Report | Enable AVETMISS Reporting for the Course |

Subject
This menu allows you to create and manage Subjects for the Course, Subjects are added here and then linked with the Course Subject section. To add subjects, follow the instructions below:
- Click Course > Subject. This page contains list of current Subjects available in your system.
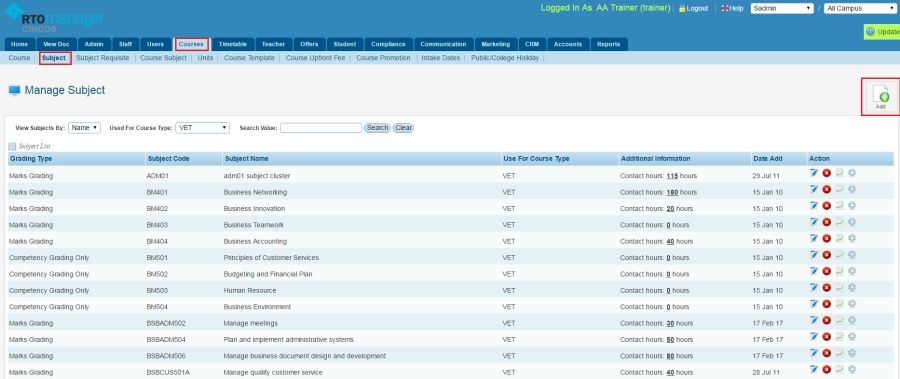
- To edit/delete the existing subjects, click
 icon
icon - To add new subject, Click Add.
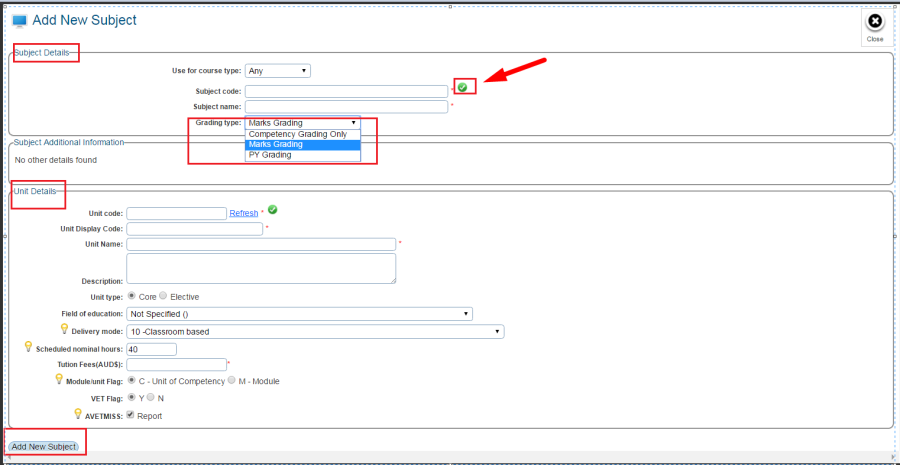
- Enter subject details such as course type e.g. ELICOS, VET or HigherEd, subject code, subject name. Make sure to tick the green check icon
 to get default related module information from AVETMISS module/unit list.
 - Enter Unit Code and click green icon to get default related unit information from AVETMISS module/unit list.
- Once all relevant information is completed, Click Add New Subject to save.
Clustered Subjects
Clustered subjects refer to a group of units of competency that are clustered together in one Subject based on their industry or occupation relevance. Multiple units can be added to a Subject after it is created with an initial Unit.
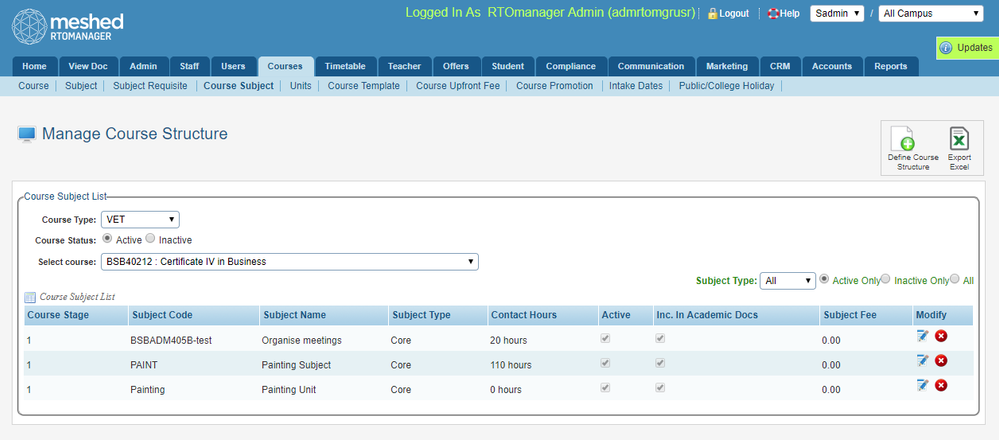
Course Subject
This menu allows Users to manage Course structure and link the available Subjects to the Course as core or elective.
Define Course Structure
Define the Course structure by linking from the available Subjects to the Course as core or elective.
To set up, follow the instructions below:
- Click Courses > Course Subject
To add subject to the Course, follow the instructions below
- Select the Course Type
- Select Course Status - Active/Inactive
- Select Course
- Click Define Course Structure icon

- This will show the pop up window to select the available Subject and allow to add to the Course Structure.

- Select desired Subject to add from the list
- Select Stage - Semester or Year Stage
- Select Subject Type - core or elective
- Enter Subject Fee - subject fees are later used to generate invoices
- Set Active - this is to ensure selected subject are active and used in course structure, subject can be made inactive if they no longer used in current course structure
- Set Include in Academic Docs - this is to use for the academic document generation, where only the subject flagged are included
- Click Add Subject Details
Once the Subject has been added the message below will be displayed.

VET Course Specialisation
Define and manage VET Course Specialisations. It is possible for multiple Specialisations to be managed for each VET Course.
To set up, follow the instructions below:
- Click Courses > Course Subject
- Select the Course Type as VET. (The Manage Specialisation Icon is only available when the Course Type is set as VET)
- Select Course Status - Active/Inactive
- Select Course
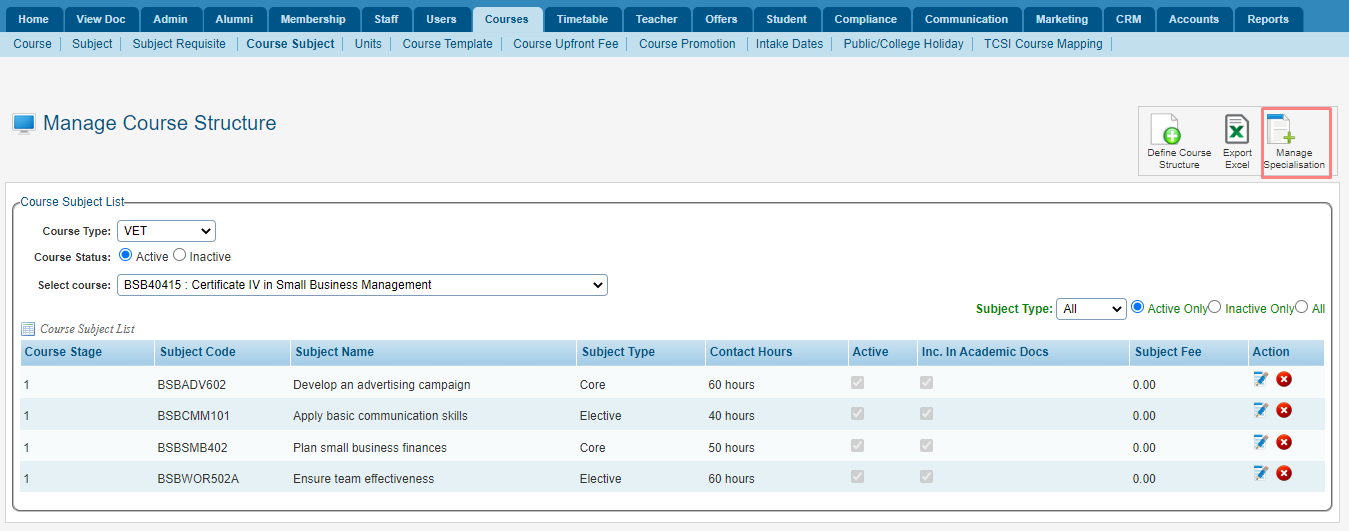
- Click Manage Specialisation icon
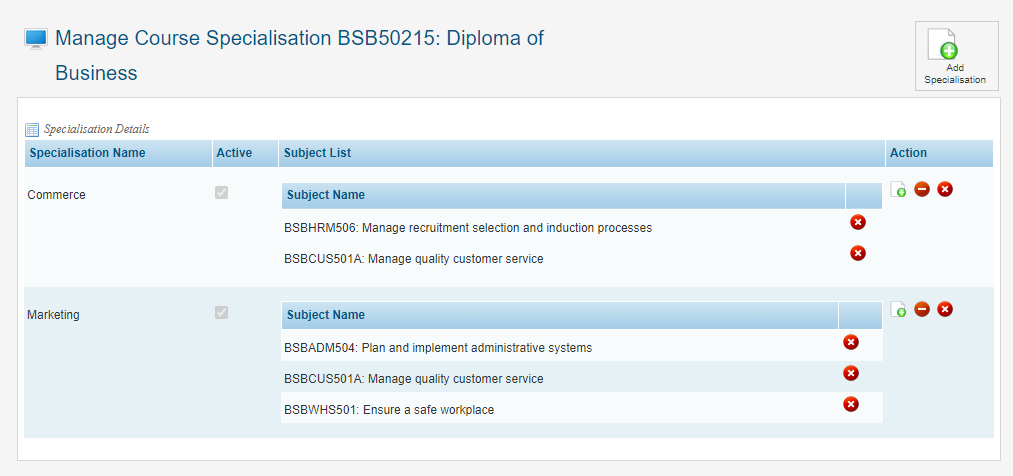
- The Manage Specialisation window is shown.

- Click the Add Specialisation icon
- The Add Specialisation window is shown.
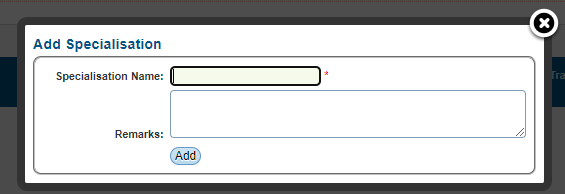
- Enter Specialisation Name and Remarks
- Click Add
- Click Add Subject Icon
- The Add Subject window is shown

- Select the Subject
- Click Add
Multiple Subjects can be added to a Specialisation. A Subject can be removed using the Delete Action Icon.
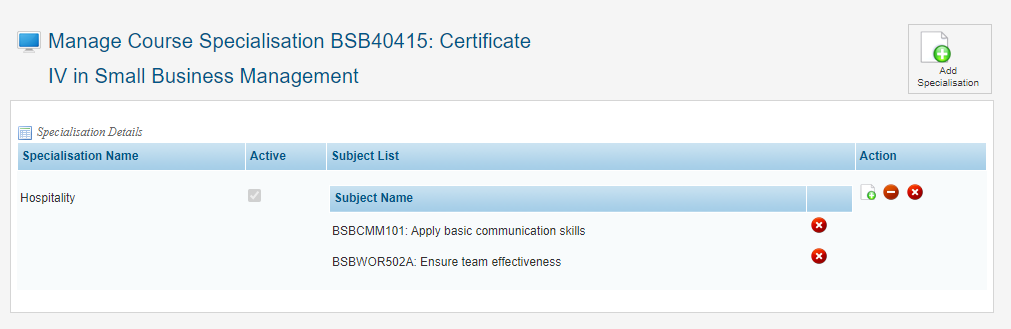
Multiple Specialisations can be added for a Course. Each Specialisation can be Managed using the Disable or Delete Action Icons.
If a Course has specialisation information associated with it the specialisation:
- can be selected during the Application process
- can be selected during the Offer Management process
- is displayed in the Student Course information
- is displayed in the Student Result information
- displays a warning when Certificates are being generated if the Student has not met the Subject requirements
Unit
This menu allows you to manage units and link it to Subject and allow to update the information linked with the Unit.
Course Template
A course template includes information on how many core and elective subjects a student needs to do to complete the course. To set up, follow the instructions below:
- Click Courses > Course Template
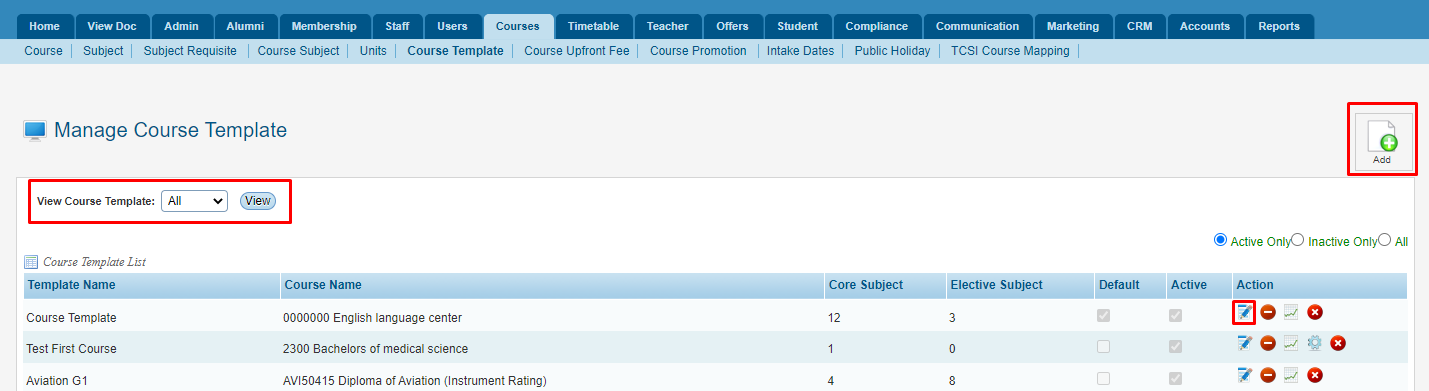
- Choose the course template from the drop down menu and click View. Course template list will appear below. The list includes Course ID, course name and number of core and elective subjects.
- To update the information click edit icon . A pop up screen will appear and will allow you to update course information. To make this template active, tick the Set Active box. To set as default template, tick Set Default.
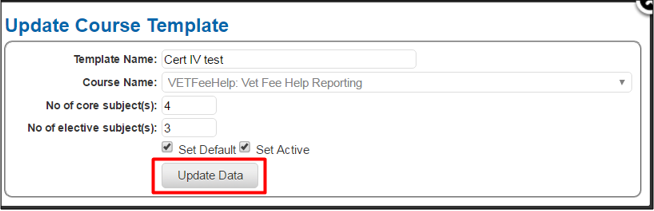
- Click Update Data to save changes.
Course Upfront Fee
This menu allows you to manage settings for fees which are payable upfront, payment schedules, and Material Fees, depending on the Course Type.
VET Courses
The upfront fee and payment instalment and frequency information when setup will be automatically linked when generating the offer letter. Here the options are to setup for Course, Origin, Material Fee, specific Agent or All Agents.
To set up the Upfront Fee & payment schedule, follow the instructions below:
- Click Courses > Course Upfront Fee
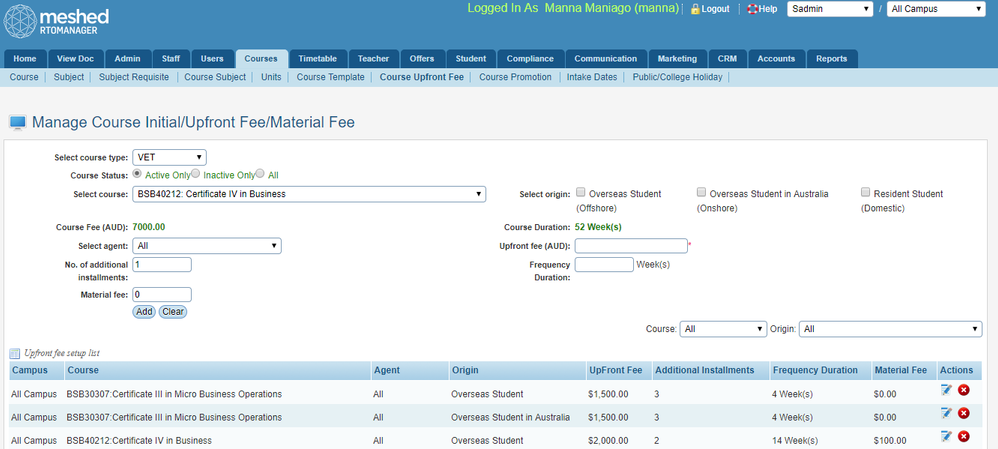
- Select a Course Type of VET
- Fill in the Manage Course Initial/Upfront Fee/Material Fee form. See the Field Descriptions table below for more information.
- Click Add to save the information.
Field Descriptions
| Field | Description |
|---|---|
| Course Type | The type (e.g. VET, ELICOS, etc.) of Courses that will be listed in the Course field. This selection determines which fields are displayed on the form. The types of Courses available in the System are configured in Admin > Configuration and Setup > Course Type |
| Course Status | Options to filter the Courses listed in the Course field. Options are:
Only one option can be selected. This information is associated with the Course and is managed in Course > Courses |
| Course | Select the Course required for the Fees being setup. The Courses listed are determined by values selected for the Course Type and Course Status fields. |
| Origin | There are 3 options for the Student Origin:
Multiple Student Origin options can be selected and a corresponding entry will be added to the Upfront Fee list for each option selected. |
| Course Fee | Displays the Course Fee for the course currently selected in the Course field. This information is associated with the Course and is managed in Course > Courses |
| Course Duration | Displays the Course Duration for the Course currently selected in the Course field. This may be shown as Days, Weeks, Months, or Years. This information is associated with the Course and is managed in Course > Courses |
| Agent | Typically the Upfront Fee is set for a Course & Student Origin for All Agents, however if required it can be set for specific Agents. |
| Upfront Fee | The amount for the initial Tuition Fee a Student will pay. This is a mandatory field. |
| No. of Additional Instalments | The number of scheduled Tuition Fee payments a Student will be required to pay. |
| Frequency Duration | The frequency (how often) of the scheduled Tuition Fee payments a Student will be required to pay. |
| Material Fee | The amount of the initial Material Fee payment a Student will be required to pay. |
ELICOS Courses
The Material Fee information when setup will be automatically linked when generating the offer letter. Here the options are to setup for Course, Origin, Material Fee.
To set up the Material Fees, follow the instructions below:
- Click Courses > Course Upfront Fee.
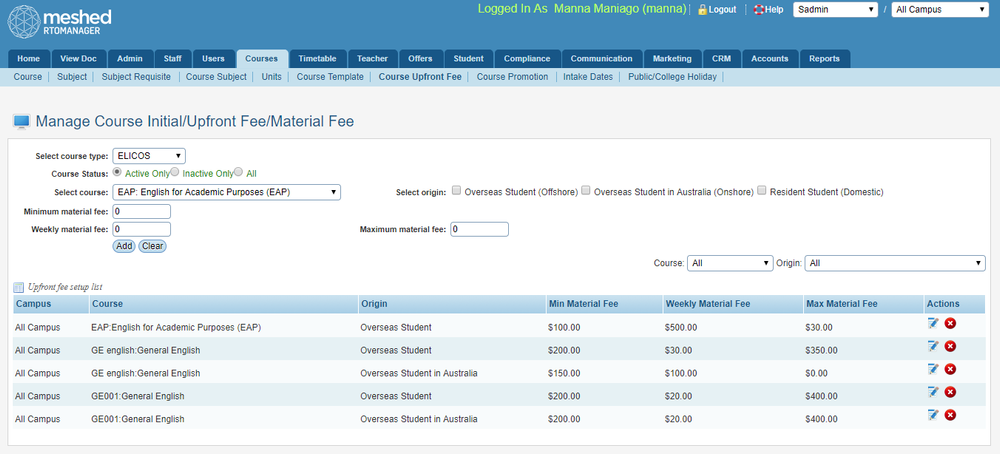
- Select a Course Type of ELICOS
- Fill in the Manage Course Initial/Upfront Fee/Material Fee form. See the Field Descriptions table below for more information.
- Click Add to save the information.
Field Descriptions
| Field | Description |
|---|---|
| Course Type | The type (e.g. VET, ELICOS, etc.) of Courses that will be listed in the Course field. This selection determines which fields are displayed on the form. The Types of Courses in the System are configured in Admin > Configuration and Setup > Course Type |
| Course Status | Options to filter the Courses listed in the Course field. Options are:
Only one option can be selected |
| Course | Select the Course required for the Fees being setup. The Courses listed are determined by the Course Type and Course Status fields. |
| Origin | There are 3 options for the Student Origin:
Multiple Student Origin options can be selected and a corresponding entry will be added to the Upfront Fee list for each option selected. |
| Minimum Material Fee | The minimum weekly amount for the Material Fee a Student will pay. |
| Maximum Material Fee | The maximum weekly amount for the Material Fee a Student will pay. |
| Weekly Material Fee | The weekly amount for the Material Fee a Student will pay. |
Edit Course Upfront Fee

This Action Icon allows for the Fee information to be Edited.
Delete Course Upfront Fee
![]()
This Action Icon allows for the Fee information to be Deleted.
Course Promotion
This menu allows you to manage your course promotion set up which will help you to define specific prices your courses to your different target market. The prices you will set up will show up when a Student or Agent login to the system and apply for the course online. To set up, follow the instructions below:
See Course Promotion for more information
Intake Dates
Before Students can apply for a Course, intake dates need to be set up so that during the Application they can select dates for when they will commence their study.
This menu allows you to setup and manage intake dates for Courses. Once setup the intake dates will appear during the 5-step application process for the Courses selected. This is also linked with Offer Letter section, and the Student Course section.
For detailed information see Course Intake Setup.
Manage Public Holiday
This menu allows you to add Public holidays. This will be reflected on the students’ calendar for attendance and intake dates.
- Click Courses > Public Holiday.
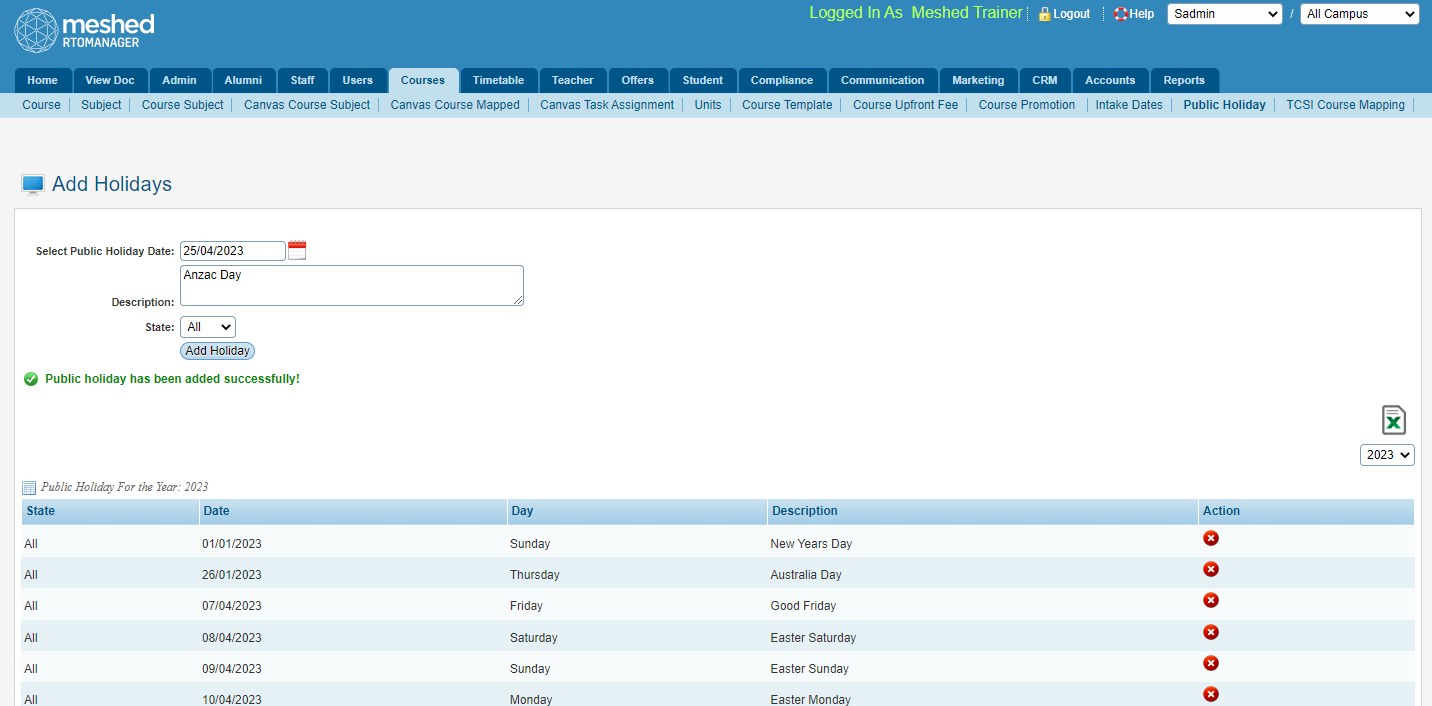
- Click the calendar icon to select Public holiday date.
- Type in Holiday Description g. Australia day.
- From the drop down menu, select applicable State.
- Click Add Holiday to save.
- To delete a holiday entry, click delete icon .
Training Plan Template
The template is defined for a particular course as how the course will be delivered to the student in terms of time period and priority. This is useful for delivering training to domestic students that are Trainees or Apprentice who go through different timeline on their unit delivery and on the job assessments. Once the training plan template is created student can then be assigned to the template to calculate their units respective start and finish date relative to the Training plan template.
To manage this function, follow the instructions below:
- Click Courses > Training Plan template
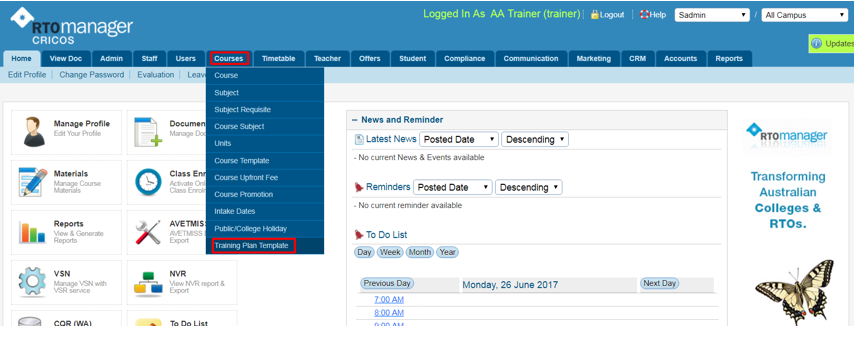
- Select the course you will be assigning a training template for.
- Enter the new Template name e.g. Template 3 ( as shown below)
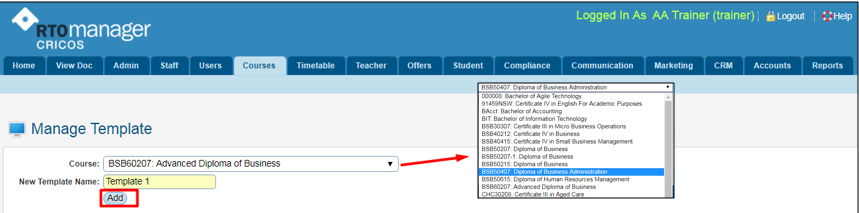
- Click Add to create new template.
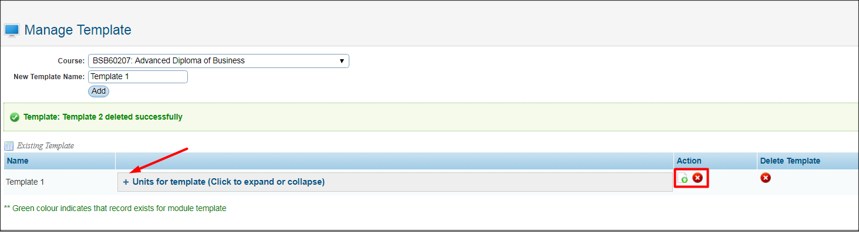
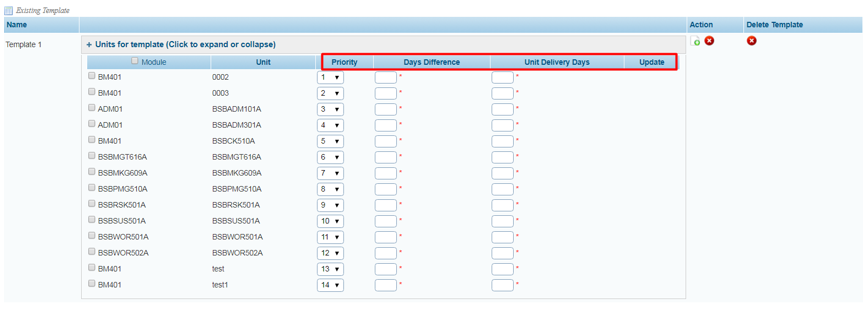
- Click the + next to Units for templates to expand and view list of units.
- The list will include all Units/ modules associated with the course. This is where you can select the modules you would like to include in the course, change tier priority ( for completion), indicate days difference and unit delivery days as per your course structure.
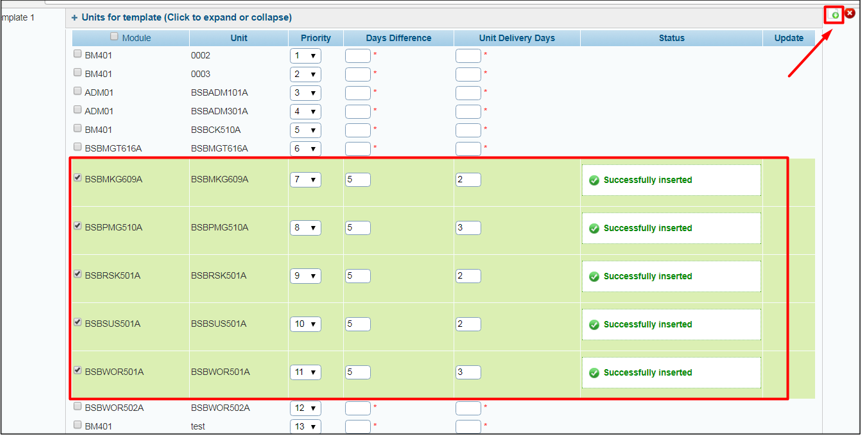
- Once all Units that is required
 to be added into the course structure has been ticked and days difference as well as Unit delivery days has been entered, click this icon to add these units to the template.
 - System will marked the units ‘Successfully inserted’ and will be marked green as shown below:
Note: Once the template is set up then it can be used during Student Subject/Unit enrolment from the Student Profile Training Plan Icon.
